
Proxy Scraper
A standalone scraping service that routes requests through residential proxies, separate from individual scraper configurations.
The Proxy Scraper is a standalone scraping service available on the Proxies page. It routes requests through residential proxies, allowing you to specify a target URL, select a proxy country, and retrieve the scraped content directly from a single interface.
Proxies Page Tabs
The Proxies page is organized into four tabs:
| Tab | Description |
|---|---|
| Proxy Scraper | Scrape any URL through a proxy using MrScraper's built-in scraping engine. |
| Proxy Setup | Generate and configure residential proxy credentials for external use. |
| Analytics | Monitor proxy bandwidth consumption and request statistics. |
| Proxy Users | Create sub-user accounts and allocate proxy bandwidth. |
Tab Switching Behavior
- When you switch between tabs, your scrape results are preserved. You can navigate away and return to find your results intact.
- If a scrape is in progress, you receive a warning before switching tabs to prevent losing an active request.
- Completed proxy scrape results are also available on the Result section. If you navigate away during a long-running scrape, you can find the results there.
- Your active tab is saved in the URL parameters. You can bookmark or share a direct link to any tab, and it will open in the same state when revisited.
Proxy Scraper
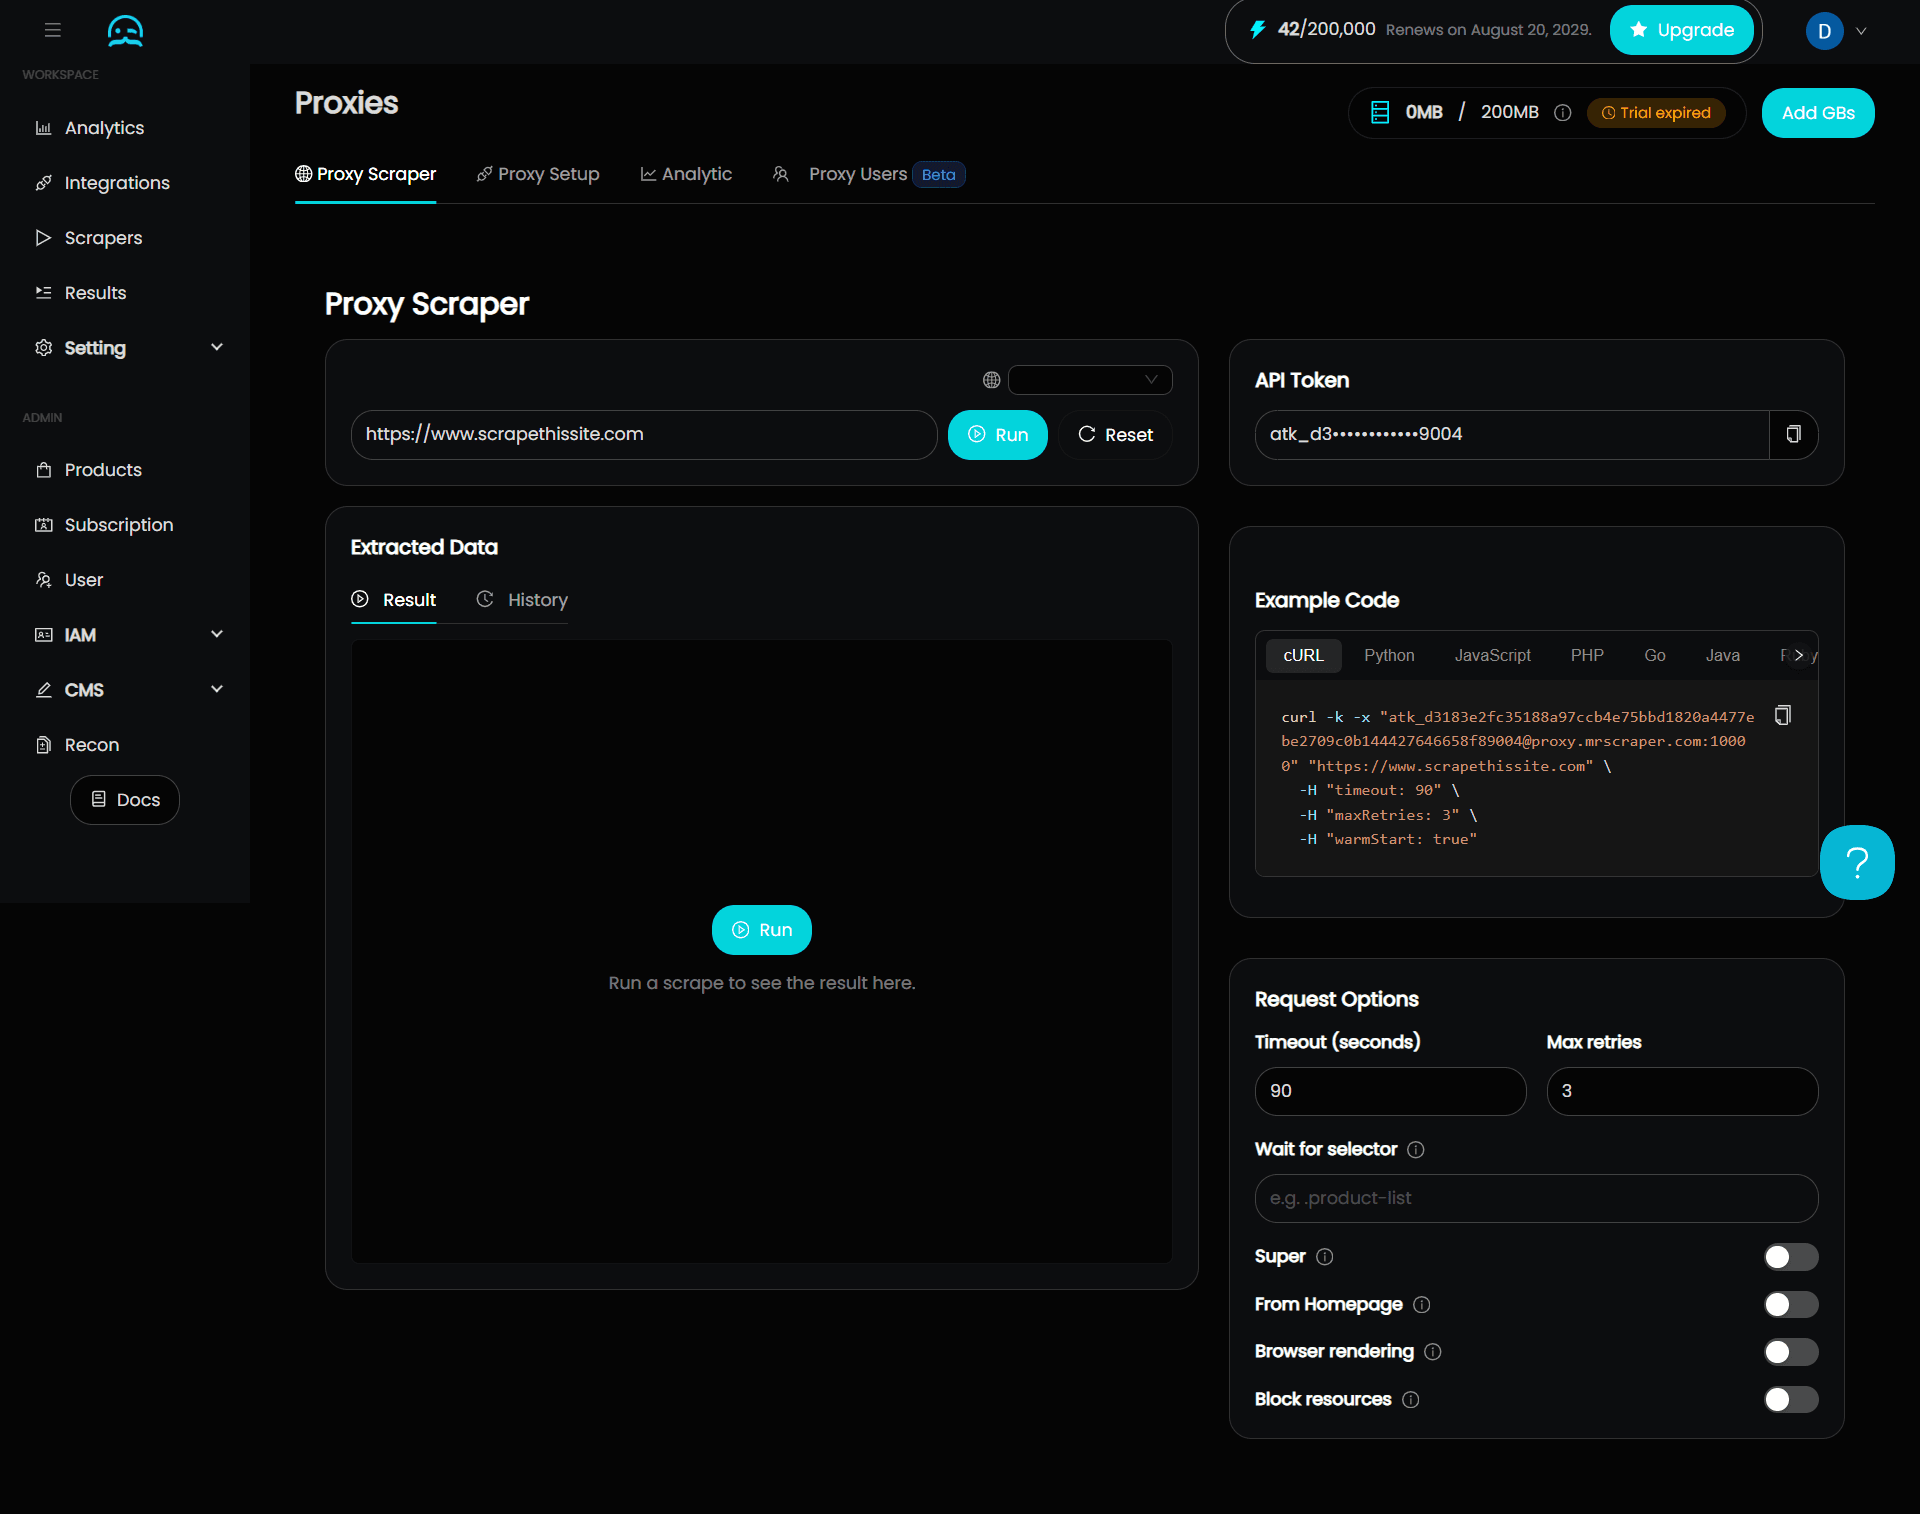
The Proxy Scraper tab is an interactive workspace for running on-demand, proxy-powered scraping requests. It shares the same interface layout as the Scraper API but adds a proxy country selector so every request is routed through a residential proxy.
Enter a Target URL, select a proxy country from the dropdown, and click Run. MrScraper's scraping engine fetches the page through a residential proxy in the selected region and returns the extracted content.
Completion Notification
When a proxy scrape finishes, you receive an in-app notification confirming the result is ready. This lets you queue a request and continue working without watching the screen.
Target URL
In the Target URL panel, you configure and run the request:
- Enter the target URL.
- Select Run to send the request, or Reset to clear the current configuration.
- Select a country to load the page from.
API Token
You can copy your secret API token for authenticating requests to the MrScraper API. Keep this value private.
Request Options
The request options panel controls how the proxy scraper handles each request. Adjust these settings to improve reliability and performance.
| Setting | Default | Description |
|---|---|---|
| Timeout (seconds) | 90 | Maximum time in seconds to wait for the page to load. |
| Max retries | 3 | Maximum number of retry attempts if the scrape fails. Failed requests are automatically retried up to this limit. |
| Wait for selector | None | Pause until a specific CSS selector appears in the DOM. Useful for content that loads asynchronously after the initial page load. |
| Super | Off | Uses additional resources to improve extraction accuracy on complex or protected websites. |
| From Homepage | Off | Redirect to the target homepage first before going to the target URL. |
| Browser rendering | Off | Renders the page in a headless browser, executing JavaScript before extracting content. Required for SPAs and dynamic websites. |
| Block resources | Off | Skips non-essential assets (images, fonts, CSS) to reduce bandwidth and improve speed. |
Bandwidth May Differ from Browser
Our bandwidth is not 1:1 with the bandwidth you see in your browser when opening the target page. This is due to our retry mechanism and techniques used to avoid blocking from the page.
Baseline Bandwidth Cost
Each proxy scrape includes a fixed 4MB cost for the browser session and request handling, in addition to the page content itself.
Proxy Setup
The Proxy Setup tab lets you generate residential proxy credentials for use outside the Proxy Scraper. For example, in your own scripts, third-party tools, or external applications.
Follow these steps to generate a residential proxy:
Go to the Proxies page by clicking the globe icon in the left sidebar.
Select the Proxy Setup tab.
Scroll down to the Proxy Configuration section and configure your proxy settings.
Click Generate to create a new proxy credential.
Copy the generated proxy URL and use it in your application or tool.
Analytics
The Analytics tab provides a real-time overview of your proxy bandwidth consumption and request performance. It displays the following summary cards:
| Metric | Description |
|---|---|
| Total Bandwidth | Total proxy bandwidth consumed (displayed in MB or GB). |
| Total Requests | Number of proxy requests made within the selected period. |
| Success Rate | Percentage of proxy requests that completed successfully. |
| Success | Count of successful proxy requests. |
| Failed | Count of failed proxy requests. |
Available Filters
You can narrow the analytics view using the following filters:
| Filter | Description |
|---|---|
| Time Range | Select a time window (e.g., 1 Hour, 24 Hours, 7 Days, 30 Days). |
| Interval | Choose the data granularity (e.g., Hourly, Daily). |
| Username | Filter by a specific proxy sub-user. |
| Country | Filter by proxy country/region. |
| Timezone | View data in your preferred timezone. |
Note
Analytics data may take up to 5 minutes to update. The dashboard refreshes automatically, or you can click the refresh icon on the top right manually to fetch the latest data.
Proxy Users
Note
This tab is still in Beta phase
The Proxy Users tab lets you create and manage sub-user accounts for your proxy service. Each sub-user receives their own credentials and a dedicated bandwidth allocation drawn from your main proxy bandwidth pool.
This is useful when you need to:
- Distribute proxy access across team members or clients
- Control and limit bandwidth usage per user
- Track individual proxy consumption separately
Creating a Sub-User
Follow these steps to create a new proxy sub-user:
Navigate to the Proxies page and select the Proxy Users tab.
Click the + Create Sub-User button in the top-right corner.
In the Create Sub-User dialog, fill in the following fields:
- Username suffix (optional): Enter a suffix to append to your account email. Only alphanumeric characters are allowed; symbols and hyphens are not permitted.
- Bandwidth Quota: Enter the amount of bandwidth (in MB) to allocate to this sub-user. The value is drawn from your unallocated bandwidth pool.
Click OK to create the sub-user.
Note
You can create up to 80 sub-user.
Renaming username
You can rename a username suffix in the Proxy User table by clicking the edit icon beside the username.
Editing Bandwidth Allocation
To change a sub-user's bandwidth limit:
Locate the sub-user in the table.
Click the edit icon (pencil) next to the Bandwidth Limit value.
Enter the new bandwidth amount (in MB).
Note
For user with Enterprise plan you can select Unlimited to pay as you go.
Confirm the change.
The updated allocation is reflected immediately. Any bandwidth freed up returns to the unallocated pool.
Deleting a Sub-User
To remove a sub-user, click the delete icon (trash) next to their row in the table. The bandwidth that was allocated to the deleted sub-user is returned to your unallocated pool.
Overview
Your complete guide to MrScraper Residential Proxy: static and rotating configurations, global coverage, endpoints, and common web scraping use cases.
Proxy Generator
Learn how to generate Residential Proxy credentials in the MrScraper dashboard for use in your own scripts, third-party tools, and external apps.